
- Guides & Tools
- OpenID Connect Visualizer
- Getting Started
- eIDs
- Guides & Tools
- Articles
- Age Verification
- Authorize URL builder
- Caller Authentication with CIBA
- OpenID Connect Visualizer
- Single Sign-on
- Creating test users
- Work with metadata
- App switching
- Choose language
- Prefilled input fields
- Custom styling
- Private key JWT authentication
- Pushed Authorization Requests (PAR)
- Get ready for production
- Telemetry & observability
- Integrations
- Reference
Guides & Tools
OpenID Connect Visualizer
An interactive demo lets you run an OpenID Connect Authorization Code Flow and observe the entire process from sending an authentication request to obtaining and validating an ID token.
Use this demo to understand OpenID Connect
OpenID Connect (OIDC) enables client applications to verify the identity of the user based on authentication performed by an Authorization Server. If the authentication flow completes successfully, the client application receives an ID Token — a JSON Web Token (JWT) containing identity information about the user.
This visualizer lets you run the flow step by step and observe requests and responses exchanged between the Client application and Idura Verify acting as the Authorization Server, so you can understand what happens at every step.
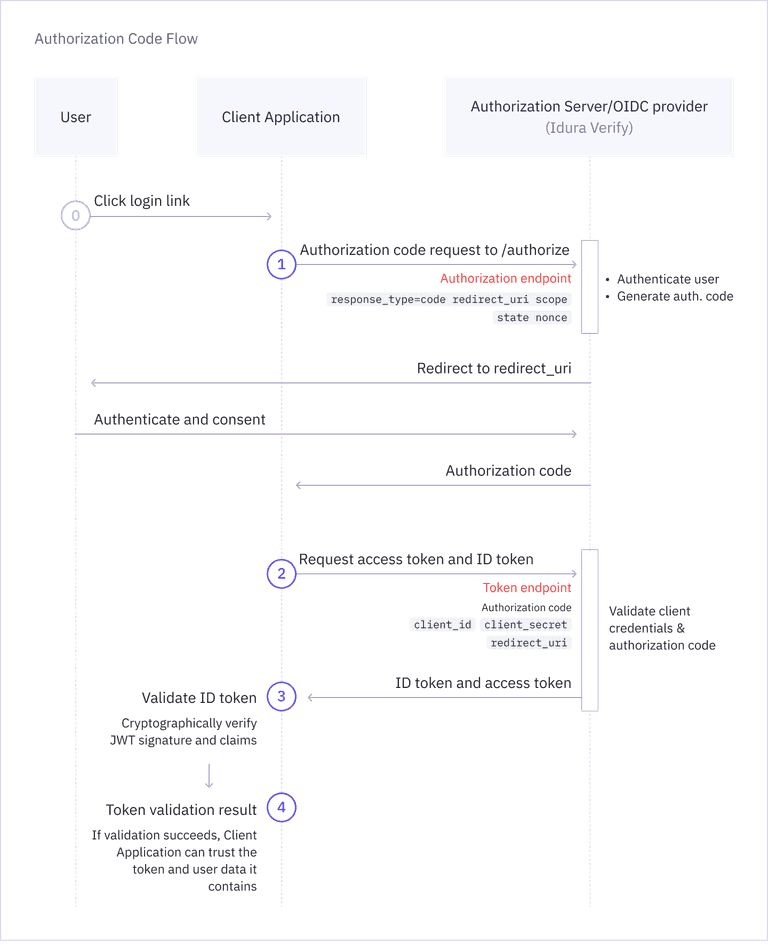
Authorization Code Flow
Authorization Code Flow is the most common OIDC flow for web applications. The diagram below shows how the Client Application and Authorization Server interact to complete this flow.
Try the Interactive Demo
Click through the steps to act on behalf of the Client Application.
Redirect the user to Idura Verify for authentication
a. Create an authentication request (authorize URL)
Build the authentication request by generating an authorize URL with the required parameters (for example, response_type, client_id, redirect_uri, and scope). The visualizer is prefilled with defaults, so it works out of the box. You can adjust request parameters and use your own application credentials by clicking Configure.
Request
GET https://docs-samples-test.criipto.id/oauth2/authorize?
    response_type=code
    client_id=urn:oidc:visualizer
    redirect_uri=https://docs.idura.app/verify/guides/oidc-visualizer
    scope=openid
b. Redirect the user to Idura Verify
Press Redirect to open the authorize URL. Complete authentication as the end user with an eID of your choice (please use test user credentials).